Liquid Culture Basics
Liquid tissue cultures are used to expand mycelium into a liquid solution to inoculate your chosen substrate.
Liquid (tissue) cultures are used to expand mycelium into a liquid
solution to inoculate your chosen substrate. Like a multi-spore
syringe, except the spores have germinated into a network. Since the
spores are already germinated; colonization times are substantially
faster and inoculated substrates have an edge over contamination with
speed.
In addition to the significant speed boost over MS (multi spore) inoculation, mycelium is not harmed by hydrogen peroxide (H2O2), so this can be added to your substrate to help reduce contamination. Normally you can not do this until the mycelium has started growing, because H2O2 kills the spores.
One spore syringe can be made into gallons of liquid culture. One spore print, agar culture and mushroom tissue can also make gallons.
Liquid cultures are economical, as 1cc from a spore syringe can supply you with a large volume of liquid inoculant which can be used on many jars/bags. Also if the liquid inoculant is a clone (generated from sectored agar or mushroom tissue), then each jar should show similar growth speeds and maturity.
Liquid cultures are normally at a 4% dilute solution of various sugars and other nutrients in water.This would be 4 grams of sugars per 96 ml/cc water. (Water weighs 1 gram per ml/cc.)
Medium
Some nutrient sources are:
Dextrose alone is usually not recommended, but will work, due to the lack of additional nutrients its growth may be slower but due to its clarity it may be easier to spot contamination. Light malt extract and honey can be used alone. Additional nutrients can be added such as peptone, various flours could be used but it is much harder to determine the stage of mycelium growth due to cloudiness.
1 tablespoon of light malt extract and 1 tablespoon dextrose were weighed out. These are the weights;
1 tablespoon light malt extract = 10.3g
1 tablespoon dextrose = 10.1g
Give or take a point of a gram.
Malt and Dextrose
One member uses --
1 tablespoon dry malt extract or dextrose to 250ml (1 cup) water.
Another --
2% dextrose and 2% light malt extract.
This would equal close to 1/2 tablespoon dextrose and 1/2 tablespoon light malt extract per 250ml (1 cup) water.
Nanook from Nan's Nook uses --
1 level teaspoon dextrose (or light malt extract) to 75ml water.
-OR-
1 1/4 teaspoon dextrose (or light malt extract) to 100ml water.
Honey
4 cc/ml is the exact 4% ratio wanted. A syringe without the needle inserted is good to use as a measuring device. 1 teaspoon organic yellow honey to 100ml water is fairly close.
Note on ratio of solution
If your solution is a little off (3%-5%), don't worry. It'll still put out viable mycelium in most situations. It is better to be too weak a solution than too strong, too strong a sugar solution (around 10%) is toxic for the mycelium, and will not let anything grow in it (why jam is called preserve!)
Mixing
Once you have picked your method (which ever suits you best or is easiest to get) then its time to do some mixing.
Optionally, water can be hot or warm before adding sugars to allow for quicker dissolving.
Wrap top with aluminum foil and place jar in pressure cooker and slowly bring it up to 15 psi. for 15-20 min. Longer with Karo/Honey can cause carmelization.
Allow pressure cooker to cool before removing.
Vacu-tainers
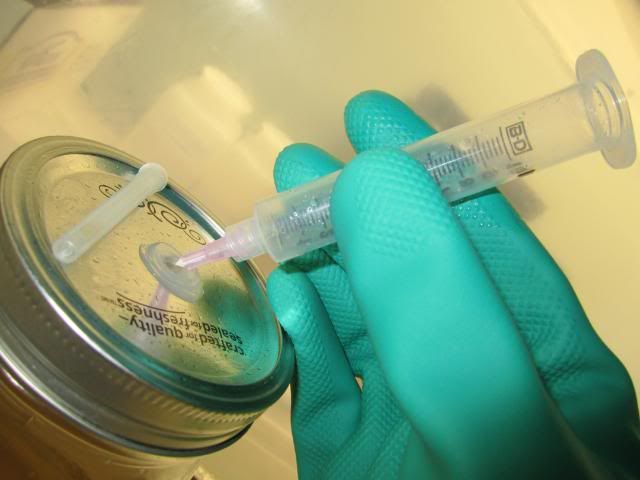
You can bore a small hole big enough for a syringe needle in the top of a jar. (Half pints work best for this) Now put a blob of silicone sealant on it (preferable transparent) on both sides. Swirl it around to make sure it is a centimeter thick around the hole on each side. This is a self healing inoculation point so you can add spores and suck up inoculant without having to open the jar after sterilization. If you band the jar tight before pressure cooking, it will form a vacuum and suck in spores, so you must only prick the injection spot quickly. If you leave the band loose, you should tighten it right after the pressure cooker has cooled down, as it will not have a vacuum seal. You should always wipe your silicone injection spot and needle (flame sterilize before) with alcohol before inoculation.
Agitation
Some people add a piece of broken glass, a glass marble or a pebble to the jar before sterilization. Agitating allows you to cut up the mycellium which can form into an unsuckable clump in the jar. This is why wide (18 gauge or lower) needles are preferable.
A slightly more advanced method is adding a stir rod (or just a 1" piece of non-insulated wire) to the jar and using a magnetic stirring plate to agitate the mycelium. This is the preferred method of agitation because it doesn't have the potential to get your lid filter (polyfil for example) wet when you shake the jar, which can lead to contamination. Do it yourself (DIY) magnetic stirrers are pretty easy to make and there are a ton of guides available both on the Shroomery.org forums, and the Internet.
(TODO) Add links
Microwave sterilization
It is possible to sterilize honey/Karo in the microwave. Be sure to add more water to the mixture as it will boil off during heating leaving you with a more concentrated sugar solution (this does not occur in a pressure cooker). Do not use metal bands in the microwave. Plastic lids are sold next to the metal ones. Never put thin metal like tinfoil or syringe needles in the microwave. Bring the liquid to a boil, then turn to low/defrost for about 15 minutes. KEEP THE CAP LOOSE! Allow it to cool completely in the microwave for a few hours.
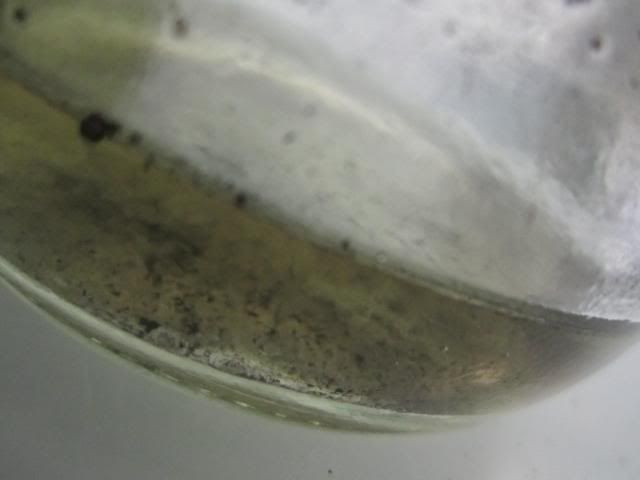
Sediments
Once removed, some sediments may be present.
To fix this, open up the jar and filter liquid through 2 coffee filters, stick liquid back in jar, cap with filter lid, and pressure cook again. If you have a lot of liquid you can decant it carefully into another jar leaving the sediment behind. (The sediments are not harmful but can be mistaken for mycelium growth, it is nicer to see clear growth) This should not be done with Karo/honey. After a few days with honey proteins may sink to the bottom or float around. After shaking these will re-mix.
Aeration
During sterilization/heating most of the oxygen will be driven out of the liquid. Shaking will help the network grow faster, but things like hooking up air flow to jars are not necessary. Be careful not to wet the filter patch (if using one) as this can cause contaminants to grow from the outside inwards through the filter.
Growth
Once inoculated by whatever means (spores, clone, agar), stick in a DARK place with a temp of 82-86F optimally, and room temperature if there is no incubator available. Signs of growth after one week max, and fully done at week 3 max. Some see growth in under a day and fully done in 3. Once growth has slowed down (done), either use immediately or store in a fridge.
Storage
Liquid cultures can be stored in a fridge for 6-8 months (or longer). Some add a little H2O2 (approx 1-3cc) at this point since the mycelium is able to handle it, this can help prevent contamination.
Sugar carmelization
With Karo and Honey, if you PC for too long your solution may turn yellowed. This is called caramelization and is over-baking of the sugars which may result in little or no growth at all. If this happens you can still try and grow a culture in the caramelized sugar jar, but if you are pressed for spores it is best to just start over. This is something you want to avoid. Liquids don't take very long to sterilize so you don't get any benefit from PCing for longer than 15-20 minutes max.
Boil sterilization
If you do not own a pressure cooker, boiling can also be used. Bring to a high rolling boil and boil your containers with water at least halfway up the jars for 20 minutes.
Notes
1 ml water weighs 1 gram.
1 tablespoon dextrose weighs ~10 grams. (may vary slightly)
1 tablespoon light malt extract weighs ~10 grams. (may vary slightly)
10 ml honey weighs 14 grams.
1 tsp (5 ml) honey = 7 g
1 tbsp (15 ml) honey = 21 g

 Shop for: ½ Pint Jars
by calavera:
http://www.shroomery.org/forums/showflat.php//Number/5585251
1 big computer fan with speed control
4 screws that fits in the fan's four hole
2 magnetic steerer stick's (original)
1 cd case
1 12v power supply for the fan
1 little piece of bluetech
stick one of your magnetic cticks on the center of the fan. screw in the 4 scews. the smaller part of the cd case goes on the top of the screws, adjust the scews until the cover is as close as pissible, but not touching the case.

plug in, adjust the speed have fun!
by blacklabrat:
http://www.shroomery.org/forums/showflat.php/Number/5568724
I would like to introduce my new little friend...........

SIR MIX-A-LOT.
OK, Right off the bat let me make it clear that I can take no credit for this. It is an idea that has been ripped off and inspired by several others who have done the DYI magnetic stirrer plate method. It works great, took me less than an hour to make and the best part...it didn't cost me a dime. FREE! Just scraped up a few items I had laying around the house.
Here's how it was done:


~ Started off by mounting the fan to a block of scrap lumber. Connected the fan to the transformer. Originally I was going to add a dimmer switch, but after testing I deemed it unnecessary.
~ Next, I took a canning lid and hot glue gunned it to the top of the fan. Place the magnet in the center of the canning jar lid. Tested placement by plugging unit on to make sure there was no wobble. Hot glue gunned it once the magnet was properly centered.

~Then I cut two blocks of lumber about 1/8" taller than the height of the fan/jar lid/magnet assembly. Mounted these to the side of the fan with glue and screws. Fixed a square of plexiglass to the blocks. This is the base surface where the LC jars sit.
Turned on to make sure that the fan was spinning freely.
Check. Everything is running quiet and smooth
Now I need some stir rods................Hmmm. Ebay? Nah. Screw buying them!
I was now determined not to shell out any cash for this project. After playing around with several ideas, many which were too loud, slow or would require me spending some of my precious beer money .....
.....
I was reminded how sometimes the simplest solutions are the most effective.

A small piece of wire about 1/4" long is quiet, effective and best of all CHEAP!
I tested it by placing a small piece of toilet paper in the jar w/ H2O and with in an hour it had broker it into small fibers.
Yeah yeah. I can hear it now."Isn't the wire going to rust?"
Eventually. But not before the LC is done. They are essentially disposable, costing you about 10 cents per 100!
And there you have it.
How well does it work? Check out the first pic!
It spins like Dorthy in a tornado.
JUST ADDED
Need to warm up the temp of your LC? Try this:
Made one minor improvement to the Sir Mix-A-Lot magnetic stirrer.
I usually do my LC in temps around the high 80s. Currently temps in my neck of the woods are about 20 degrees too cold & I'd rather not put the stir plate in the incubator, so........................

My solution:
I removed the plexiglass base plate and temporally replaced it with a 4 quart lexan tub. The tub is outfitted with a aquarium heater set to 87 degrees and a thermometer. (I realize that the heater is a little too large for this particular application..going to get a smaller one this weekend)
I can now dial in to the exact temp I need.
If you are not sure how to do this, or if you are unsure if the fan/transformer combo you have will work, don't ask me. I'm no electrician. Besides even if I was, you gonna trust an anonymous druggie electrician who posted some shit on the web with your life?
I suggest you read up, use google, use the shroomery search function and take a trip to Radio Shack or a hardware store and ask them. You don't want to go burning your house down or electrocuting yourself. There ain't no fungus worth that!
by splifner180:
http://www.shroomery.org/forums/showflat.php/Number/5567819
I should mention that this idea was stolen wholesale from blacklabrat and this thread. Five shrooms for him.
So I've been desperately wanting to have a magnetic stirrer but my $$ was tied up in necessary things like the PC, jars, etc. So when I read that thread I thought to myself "no frickin' way, I have at least five spare fans kicking around this room and probably twice as many power supplies."
And I was right.
So I made myself a working magnetic stirrer using only stuff I had kicking around the room. The only "exotic" thing used was a spare go stone "bowl" (though it's square-shaped). The whole thing from start-to-finish was roughly 30-40 minutes.
Obtaining the magnets are only a problem if you aren't someone who has spare hard drives kicking around as a matter of principle.
Ok, so here it is. The parts all in one spot:

There you can see the enclosure (go stone box), some arbitrary-length garden ties (use string if you want, doesn't matter), the computer fan with the magnet already attached, superglue (not shown), some washers (to stand off the fan from the work surface) and a 12v power supply pinched from a humungous box I have stuffed with such things.
The assembly was simple.
* Match fan up to lid. Use sharpie to mark four holes. Drill holes.
* Strip wires on both the fan and the power supply. Attach. If the fan spins in the "wrong direction" you have the wires hooked up backward but I don't think it'll harm anything if you do.
* Attach HD magnet to the fan. It should stick since it's an extremely powerful magnet and the fan has metal inside. Power up fan.
* The goal at this point is to find the "sweet spot" for the magnet, the placement that will cause the least wobble in the assembly. A millimeter can mean the difference between a kitten purr and the magnet being flung from the fan so make small adjustments.
* Once you find the sweet spot, superglue that mofo down. I didn't bother with the jar lid like blacklabrat did.
* With the fan pointed "up" (the magnet facing up), take one wiretie end and thread it through the fan holes from bottom to top. Take the other end of the wiretie and thread it through a parallel hole in the fan. The wire tie should look like the rope on a swing set and the fan/magnet should be the wood swing itself. The wire tie cradles the fan.
* Thread enough nuts unto the wire tie so that the spinning fan will not hit the lid when pressed against. Sorry no pics for this -- my camera batteries died. Here's a drawing.

* Do the same through the other two holes. Now you'll have four wires cradling the fan with washers dropped over the wire to act as a standoff.
* Place the cover over the fan, threading the wires through the holes you drilled. Twist the ties together to secure the fan assembly to the lid.
* Place the lid over the box. Make a notch for the power wires if you want. I didn't.
That's it. All done. Here is the stirrer in action.

I should have taken multiple pictures. That one does it no justice. There is a righteous vortex in the container right now. The one in the picture is pretty small.
I should mention that there are TONS of ways I could have done this differently. I justed wanted to do it with the items I had on-hand and ...well ...these are the items I had on-hand. It's whisper quiet (calibrating the magnet is critical) and it's been running now for about 80 minutes without so much as a peep.
The stirring rod itself, like the other thread mentions, is just a 1" piece of ferrous (magnetic) metal. I just snipped a bit off a spool of ground wire I had kicking around. Heck, even a small nail might work perfectly. Tomorrow I'll pick up a bit of shrinkwrap to place around the rod. I tried different sizes (I think 1" is optimal) and I tried doing multiple bits of metal (it worked terrible for me, they all clumped together). Tomorrow I'll probably try to attach two bits of metal to polar ends of something non-magnetic, seal with shrink-wrap and see how that works. Who knows?

In addition to the significant speed boost over MS (multi spore) inoculation, mycelium is not harmed by hydrogen peroxide (H2O2), so this can be added to your substrate to help reduce contamination. Normally you can not do this until the mycelium has started growing, because H2O2 kills the spores.
One spore syringe can be made into gallons of liquid culture. One spore print, agar culture and mushroom tissue can also make gallons.
Liquid cultures are economical, as 1cc from a spore syringe can supply you with a large volume of liquid inoculant which can be used on many jars/bags. Also if the liquid inoculant is a clone (generated from sectored agar or mushroom tissue), then each jar should show similar growth speeds and maturity.
Liquid cultures are normally at a 4% dilute solution of various sugars and other nutrients in water.This would be 4 grams of sugars per 96 ml/cc water. (Water weighs 1 gram per ml/cc.)
Medium
Some nutrient sources are:
- Karo (You want the clear one that has the red label; "Light with Vanilla". DO NOT get the dark Karo, such as the one containing brown sugar)
- Honey (Non-organic has been known to work, but organic honey is highly recommended.)
- Corn sugar
- Light malt extract (or extra light. The lighter the better, because it will make it easier to observe growth in the jar.)
- Dextrose (glucose)
- While only the above are recommended, because they have been tried and tested, other sources have been successfully used, such as organic maple syrup.
Dextrose alone is usually not recommended, but will work, due to the lack of additional nutrients its growth may be slower but due to its clarity it may be easier to spot contamination. Light malt extract and honey can be used alone. Additional nutrients can be added such as peptone, various flours could be used but it is much harder to determine the stage of mycelium growth due to cloudiness.
1 tablespoon of light malt extract and 1 tablespoon dextrose were weighed out. These are the weights;
1 tablespoon light malt extract = 10.3g
1 tablespoon dextrose = 10.1g
Give or take a point of a gram.
Malt and Dextrose
One member uses --
1 tablespoon dry malt extract or dextrose to 250ml (1 cup) water.
Another --
2% dextrose and 2% light malt extract.
This would equal close to 1/2 tablespoon dextrose and 1/2 tablespoon light malt extract per 250ml (1 cup) water.
Nanook from Nan's Nook uses --
1 level teaspoon dextrose (or light malt extract) to 75ml water.
-OR-
1 1/4 teaspoon dextrose (or light malt extract) to 100ml water.
Honey
4 cc/ml is the exact 4% ratio wanted. A syringe without the needle inserted is good to use as a measuring device. 1 teaspoon organic yellow honey to 100ml water is fairly close.
Note on ratio of solution
If your solution is a little off (3%-5%), don't worry. It'll still put out viable mycelium in most situations. It is better to be too weak a solution than too strong, too strong a sugar solution (around 10%) is toxic for the mycelium, and will not let anything grow in it (why jam is called preserve!)
Mixing
Once you have picked your method (which ever suits you best or is easiest to get) then its time to do some mixing.
Optionally, water can be hot or warm before adding sugars to allow for quicker dissolving.
Wrap top with aluminum foil and place jar in pressure cooker and slowly bring it up to 15 psi. for 15-20 min. Longer with Karo/Honey can cause carmelization.
Allow pressure cooker to cool before removing.
Vacu-tainers
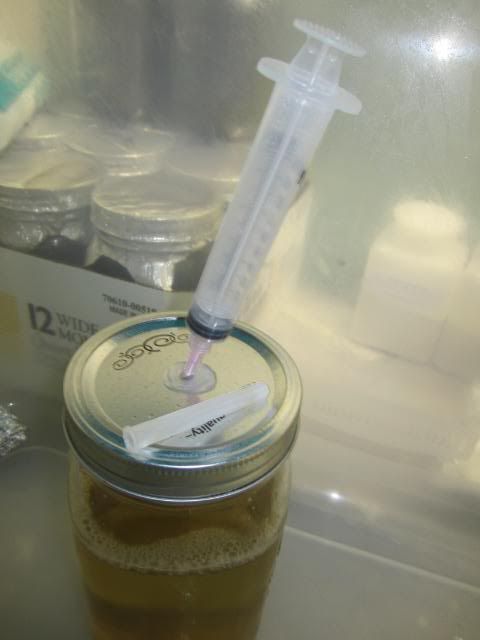
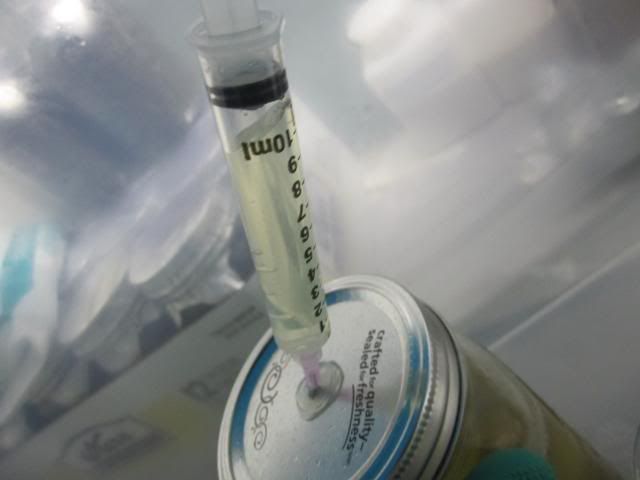
You can bore a small hole big enough for a syringe needle in the top of a jar. (Half pints work best for this) Now put a blob of silicone sealant on it (preferable transparent) on both sides. Swirl it around to make sure it is a centimeter thick around the hole on each side. This is a self healing inoculation point so you can add spores and suck up inoculant without having to open the jar after sterilization. If you band the jar tight before pressure cooking, it will form a vacuum and suck in spores, so you must only prick the injection spot quickly. If you leave the band loose, you should tighten it right after the pressure cooker has cooled down, as it will not have a vacuum seal. You should always wipe your silicone injection spot and needle (flame sterilize before) with alcohol before inoculation.
Agitation
Some people add a piece of broken glass, a glass marble or a pebble to the jar before sterilization. Agitating allows you to cut up the mycellium which can form into an unsuckable clump in the jar. This is why wide (18 gauge or lower) needles are preferable.
A slightly more advanced method is adding a stir rod (or just a 1" piece of non-insulated wire) to the jar and using a magnetic stirring plate to agitate the mycelium. This is the preferred method of agitation because it doesn't have the potential to get your lid filter (polyfil for example) wet when you shake the jar, which can lead to contamination. Do it yourself (DIY) magnetic stirrers are pretty easy to make and there are a ton of guides available both on the Shroomery.org forums, and the Internet.
(TODO) Add links
Microwave sterilization
It is possible to sterilize honey/Karo in the microwave. Be sure to add more water to the mixture as it will boil off during heating leaving you with a more concentrated sugar solution (this does not occur in a pressure cooker). Do not use metal bands in the microwave. Plastic lids are sold next to the metal ones. Never put thin metal like tinfoil or syringe needles in the microwave. Bring the liquid to a boil, then turn to low/defrost for about 15 minutes. KEEP THE CAP LOOSE! Allow it to cool completely in the microwave for a few hours.
Sediments
Once removed, some sediments may be present.
To fix this, open up the jar and filter liquid through 2 coffee filters, stick liquid back in jar, cap with filter lid, and pressure cook again. If you have a lot of liquid you can decant it carefully into another jar leaving the sediment behind. (The sediments are not harmful but can be mistaken for mycelium growth, it is nicer to see clear growth) This should not be done with Karo/honey. After a few days with honey proteins may sink to the bottom or float around. After shaking these will re-mix.
Aeration
During sterilization/heating most of the oxygen will be driven out of the liquid. Shaking will help the network grow faster, but things like hooking up air flow to jars are not necessary. Be careful not to wet the filter patch (if using one) as this can cause contaminants to grow from the outside inwards through the filter.
Growth
Once inoculated by whatever means (spores, clone, agar), stick in a DARK place with a temp of 82-86F optimally, and room temperature if there is no incubator available. Signs of growth after one week max, and fully done at week 3 max. Some see growth in under a day and fully done in 3. Once growth has slowed down (done), either use immediately or store in a fridge.
Storage
Liquid cultures can be stored in a fridge for 6-8 months (or longer). Some add a little H2O2 (approx 1-3cc) at this point since the mycelium is able to handle it, this can help prevent contamination.
Sugar carmelization
With Karo and Honey, if you PC for too long your solution may turn yellowed. This is called caramelization and is over-baking of the sugars which may result in little or no growth at all. If this happens you can still try and grow a culture in the caramelized sugar jar, but if you are pressed for spores it is best to just start over. This is something you want to avoid. Liquids don't take very long to sterilize so you don't get any benefit from PCing for longer than 15-20 minutes max.
Boil sterilization
If you do not own a pressure cooker, boiling can also be used. Bring to a high rolling boil and boil your containers with water at least halfway up the jars for 20 minutes.
Notes
1 ml water weighs 1 gram.
1 tablespoon dextrose weighs ~10 grams. (may vary slightly)
1 tablespoon light malt extract weighs ~10 grams. (may vary slightly)
10 ml honey weighs 14 grams.
1 tsp (5 ml) honey = 7 g
1 tbsp (15 ml) honey = 21 g
Club99's Honeywater Mycelium Tek
The achievement of this tech is to
shorten the time needed to colonize a jar as you'll see signs of growth
in 24/36 hours, instead waiting 3/5 days for spore germination.
The achievement of this tek is to shorten the time needed to colonize a
jar as you'll see signs of growth in 24/36 hours, instead waiting 3/5
days for spore germination.
What you need:

- A narrow mouth jar with lid
- Organic honey - best is the pale yellow one
- Mineral water
- Some H2O2 (at 3% or 12 vol.)
- Some heat resistant silicone
- A filter disk
- Drill a small hole in the lid, large enough to pass through with a needle.
- Mix a small quantity of honey (less than a teaspoon) in the water, the water must be very light yellow coloured.
- Sterilize for 30 minutes and let it cool (don't over sterilize or the sugars in the honey caramelize).
- Inject a small quantity of spore solution, 1-2 cc it's enough.
- Put in a dark warm place, better to stir a bit once a day, and wait until you see small white hairs floating in the solution,
- wait a day or 2 then add some H2O2 , few cc's, (i would put 2 cc in a 1/2 pint jar) then put the jar in the fridge. This helps to keep out contaminants. Specially bacteria.
- Now the honeywater it's ready. To use it simply suck some water with a sterile syringe and inoculate your MMGG/PF TEK style jars as usual.
- The solution will last at least 2 weeks, but anyway i wouldn't use a solution much older as the risks of contamination increases.
- A drop of silicone closing the hole helps to keep out contaminants.
- advice!! If you close air tight your jars the sterilization will produce a negative pressure that will suck ALL your syringe into the jar. Best to tight the lids after sterilization.
- You can drill 2 holes in the lid and use one to inject spores/suck liquid mycelium and the other one for gas exchange as shown in the the pic. (Thanks Dr. Dung for this tip)
Liquid Growth Medium
Very helpful instruction for growing mycelium in liquid which can then be used as inoculate to start growth immediately
Mycelium can be cultured in a liquid (as opposed to a solid like
vermiculite/brown rice flour) which you can then use to easily inoculate
substrate and start mycelium growth much faster than if you were using
spores.
You should first go to your local homebrew supply store and buy the
lightest colored powdered malt extract they have. Mix 4% (by weight)
malt extract powder with distilled water. This comes out to 1 around
tablespoon malt extract per cup of water. Bring water to boil, and then
slowly mix in the powder under stirring until the powder dissolves. Pour
this medium into any large jar with a metal lid, and make one small
hole in the lid with a nail. Cover the top tightly with aluminum foil,
and either boil the jar in water for an hour (be sure to put the jar on a
washcloth and not directly on the bottom of the pot) or use a pressure
cooker set at 15psi for 20 minutes. Let the jar cool overnight.
The next day take your spore syringe, stick the needle through the hole in the lid, and squeeze in the solution. Cover the top of the jar with aluminum foil again, only not too tightly since you'll want to allow gas exchange. Keep the jar somewhere warm and dark, and agitate it every day. You should notice the solution becoming milky, and toward the end of the incubation you'll see fluffy pieces of mycelium floating around in it. At this point you can keep it in the fridge until you're ready to use it. When you want to start a mushroom culture somewhere, flame-sterilize the needle of a 10cc syringe, let it cool, stick it through the hole in the top of the lid, and pull in as much solution as you need. You can then inject this into your substrate and it will start growing immediately. Any time you run low on mycelium solution, go through the same process with another jar only instead of injecting spores inject the last of your mycelium solution. Be on the lookout for any contamination!
The next day take your spore syringe, stick the needle through the hole in the lid, and squeeze in the solution. Cover the top of the jar with aluminum foil again, only not too tightly since you'll want to allow gas exchange. Keep the jar somewhere warm and dark, and agitate it every day. You should notice the solution becoming milky, and toward the end of the incubation you'll see fluffy pieces of mycelium floating around in it. At this point you can keep it in the fridge until you're ready to use it. When you want to start a mushroom culture somewhere, flame-sterilize the needle of a 10cc syringe, let it cool, stick it through the hole in the top of the lid, and pull in as much solution as you need. You can then inject this into your substrate and it will start growing immediately. Any time you run low on mycelium solution, go through the same process with another jar only instead of injecting spores inject the last of your mycelium solution. Be on the lookout for any contamination!
Do it yourself magnetic stirrers
by calavera:http://www.
by calavera:
http://www.shroomery.org/forums/showflat.php//Number/5585251
1 big computer fan with speed control
4 screws that fits in the fan's four hole
2 magnetic steerer stick's (original)
1 cd case
1 12v power supply for the fan
1 little piece of bluetech
stick one of your magnetic cticks on the center of the fan. screw in the 4 scews. the smaller part of the cd case goes on the top of the screws, adjust the scews until the cover is as close as pissible, but not touching the case.

plug in, adjust the speed have fun!
by blacklabrat:
http://www.shroomery.org/forums/showflat.php/Number/5568724
I would like to introduce my new little friend...........

SIR MIX-A-LOT.
OK, Right off the bat let me make it clear that I can take no credit for this. It is an idea that has been ripped off and inspired by several others who have done the DYI magnetic stirrer plate method. It works great, took me less than an hour to make and the best part...it didn't cost me a dime. FREE! Just scraped up a few items I had laying around the house.
Here's how it was done:


~ Started off by mounting the fan to a block of scrap lumber. Connected the fan to the transformer. Originally I was going to add a dimmer switch, but after testing I deemed it unnecessary.
~ Next, I took a canning lid and hot glue gunned it to the top of the fan. Place the magnet in the center of the canning jar lid. Tested placement by plugging unit on to make sure there was no wobble. Hot glue gunned it once the magnet was properly centered.

~Then I cut two blocks of lumber about 1/8" taller than the height of the fan/jar lid/magnet assembly. Mounted these to the side of the fan with glue and screws. Fixed a square of plexiglass to the blocks. This is the base surface where the LC jars sit.
Turned on to make sure that the fan was spinning freely.
Check. Everything is running quiet and smooth
Now I need some stir rods................Hmmm. Ebay? Nah. Screw buying them!
I was now determined not to shell out any cash for this project. After playing around with several ideas, many which were too loud, slow or would require me spending some of my precious beer money
.....I was reminded how sometimes the simplest solutions are the most effective.

A small piece of wire about 1/4" long is quiet, effective and best of all CHEAP!
I tested it by placing a small piece of toilet paper in the jar w/ H2O and with in an hour it had broker it into small fibers.
Yeah yeah. I can hear it now."Isn't the wire going to rust?"
Eventually. But not before the LC is done. They are essentially disposable, costing you about 10 cents per 100!
And there you have it.
How well does it work? Check out the first pic!
It spins like Dorthy in a tornado.
JUST ADDED
Need to warm up the temp of your LC? Try this:
Made one minor improvement to the Sir Mix-A-Lot magnetic stirrer.
I usually do my LC in temps around the high 80s. Currently temps in my neck of the woods are about 20 degrees too cold & I'd rather not put the stir plate in the incubator, so........................

My solution:
I removed the plexiglass base plate and temporally replaced it with a 4 quart lexan tub. The tub is outfitted with a aquarium heater set to 87 degrees and a thermometer. (I realize that the heater is a little too large for this particular application..going to get a smaller one this weekend)
I can now dial in to the exact temp I need.
If you are not sure how to do this, or if you are unsure if the fan/transformer combo you have will work, don't ask me. I'm no electrician. Besides even if I was, you gonna trust an anonymous druggie electrician who posted some shit on the web with your life?
I suggest you read up, use google, use the shroomery search function and take a trip to Radio Shack or a hardware store and ask them. You don't want to go burning your house down or electrocuting yourself. There ain't no fungus worth that!
by splifner180:
http://www.shroomery.org/forums/showflat.php/Number/5567819
I should mention that this idea was stolen wholesale from blacklabrat and this thread. Five shrooms for him.
So I've been desperately wanting to have a magnetic stirrer but my $$ was tied up in necessary things like the PC, jars, etc. So when I read that thread I thought to myself "no frickin' way, I have at least five spare fans kicking around this room and probably twice as many power supplies."
And I was right.
So I made myself a working magnetic stirrer using only stuff I had kicking around the room. The only "exotic" thing used was a spare go stone "bowl" (though it's square-shaped). The whole thing from start-to-finish was roughly 30-40 minutes.
Obtaining the magnets are only a problem if you aren't someone who has spare hard drives kicking around as a matter of principle.
Ok, so here it is. The parts all in one spot:

There you can see the enclosure (go stone box), some arbitrary-length garden ties (use string if you want, doesn't matter), the computer fan with the magnet already attached, superglue (not shown), some washers (to stand off the fan from the work surface) and a 12v power supply pinched from a humungous box I have stuffed with such things.
The assembly was simple.
* Match fan up to lid. Use sharpie to mark four holes. Drill holes.
* Strip wires on both the fan and the power supply. Attach. If the fan spins in the "wrong direction" you have the wires hooked up backward but I don't think it'll harm anything if you do.
* Attach HD magnet to the fan. It should stick since it's an extremely powerful magnet and the fan has metal inside. Power up fan.
* The goal at this point is to find the "sweet spot" for the magnet, the placement that will cause the least wobble in the assembly. A millimeter can mean the difference between a kitten purr and the magnet being flung from the fan so make small adjustments.
* Once you find the sweet spot, superglue that mofo down. I didn't bother with the jar lid like blacklabrat did.
* With the fan pointed "up" (the magnet facing up), take one wiretie end and thread it through the fan holes from bottom to top. Take the other end of the wiretie and thread it through a parallel hole in the fan. The wire tie should look like the rope on a swing set and the fan/magnet should be the wood swing itself. The wire tie cradles the fan.
* Thread enough nuts unto the wire tie so that the spinning fan will not hit the lid when pressed against. Sorry no pics for this -- my camera batteries died. Here's a drawing.

* Do the same through the other two holes. Now you'll have four wires cradling the fan with washers dropped over the wire to act as a standoff.
* Place the cover over the fan, threading the wires through the holes you drilled. Twist the ties together to secure the fan assembly to the lid.
* Place the lid over the box. Make a notch for the power wires if you want. I didn't.
That's it. All done. Here is the stirrer in action.

I should have taken multiple pictures. That one does it no justice. There is a righteous vortex in the container right now. The one in the picture is pretty small.
I should mention that there are TONS of ways I could have done this differently. I justed wanted to do it with the items I had on-hand and ...well ...these are the items I had on-hand. It's whisper quiet (calibrating the magnet is critical) and it's been running now for about 80 minutes without so much as a peep.
The stirring rod itself, like the other thread mentions, is just a 1" piece of ferrous (magnetic) metal. I just snipped a bit off a spool of ground wire I had kicking around. Heck, even a small nail might work perfectly. Tomorrow I'll pick up a bit of shrinkwrap to place around the rod. I tried different sizes (I think 1" is optimal) and I tried doing multiple bits of metal (it worked terrible for me, they all clumped together). Tomorrow I'll probably try to attach two bits of metal to polar ends of something non-magnetic, seal with shrink-wrap and see how that works. Who knows?
High Quality Liquid Culture: Step by Step
Good LC, Good Instructions
High Quality Liquid Culture: Step by Step
- Clean jars with soap and water
- Soak jars in bleach water for 25 minutes
- Rinse out well
- Bring distilled water to boil. Turn off heat
- Add: 1.5tea/1.5tea malt/dextrose per quart of water (tried higher and lower ratios, this seems to work well)
- Stir until dissolved. It can take a while for the malt to dissolve, be patient
- Filter through double coffee filters 3 times. (you can put filters in a funnel or strainer and pour solution through)
- Fill each quart jar to 600ml (my general rule is 2/3 full for any LC container), make sure liquid is still hot (prevents jar breakage in pc)
- Put stir bars in
- Put lids on loose, so nutritious steam doesn't permeate the tyvek as much
- Put on lid, then tyvek, then ring, then aluminum foil and crimp it around the edges.
- Put jars in and put the lid on the pc.
- Put stove temp on med for about 15 mins so the jars can heat without breaking and then turn it up to hot to get the pressure to rise to where you want it.
- Pressure cook these jars at 14-15psi for 15 minutes (start timer once 14-15psi is reached). Going longer than 15 minutes will ensure better sterilization, but will give you more carmelization. I don't like carmelization, some people don't care. It's up to you. I haven't had a contam yet at this time so....
- Remove from heat and allow pressure cooker to de-pressurize naturally.
- Open the pressure cooker and tighten lids as soon as pressure is back to normal. Remove the jars and immediately remove the aluminum foil and wipe off the water on top with a paper towel.
- Cover lids with a coffee filter dust cover. Held in place with a rubber band.
- Don't mind the small particles that have formed during the PC. These are good to give the myc something to get growing on.
- Allow jars to cool for 12-16 hours.
- Inoculate with 1cc or more of colonized liquid culture or spore solution. Can also inoculate with tissue culture, agar piece, or colonized grain.
- When you inoculate with spores, it can take up to a week for the spores to germinate and begin to grow.
- Incubate at 80-85 degrees.
- After 24 hours, Stir on magnetic stirrer very slow (zero vortex)
- Stir 24/7, only creating a vortex once or twice daily (for about 3 mins).Having a powerful magnetic stirrer is key to really breaking up the myc well. Some strains might need more recovery time after being vortexed. You might wanna let them sit unstirred for a few hours after vortexing.
- Colonize jar so mycelium cloud (when allowed to settle without spinning) is about 40-50 percent of liquid.
- Ready to inoculate spawn/substrate or store in fridge. I am unsure how long this will stay viable stored in the fridge. You need to keep the fridge in about the 36-40 F range. If your fridge swings to freezing temps easily this can harm or kill the LC. Warm swings will let it grow and get too thick. If you want to play it safe you could make a new LC using this one as inoculant if you've been storing your LC for a while and don't think it will be good for much longer.
- It is advisable to test your LC on a small batch of grain or BRF before committing it to larger endeavors. This way you can visually inspect for contams. Can't see contams easily in LC.
- Use Light Dry Malt (extra light even better)and Dextrose for this. Both can be found at any beer brewing shop or ordered online from a brewing store. They are cheap and using this is superior to honey or Karo.
- Use a stir bar and stirring plate. The mycelium gets thick with malt/dex LCs. Without a stir plate it might get too thick to suck into a syringe. Also, you really can't risk shaking the LC and getting the tyvek wet, as you would have to do without a stir plate. This can wick in contaminates.
- I have found the X shaped stir bars to be easy to work with. They are easier to get off of the side of the jar and spinning in the middle.
- Have 16 or 14 gauge needles. Any smaller and you will have a very hard time sucking up the mycelium.
- Use a pressure cooker with a gauge. The Presto 23 qt is a good one for the money. Keep it just under 15 psi (if it has a pressure regulating weight that allows steam to escape) and you won't lose much water inside. This is more important when doing long PC runs with spawnbags or grain jars.
- I like lids with four 1/4" holes for gas exchange on one side and another hole covered with high temp RTV port sealant on the other side. Holes can be made with a nail and then a phillips head screwdriver. It goes lid->tyvek->ring->foil. The port is a self healing injection site. Also,when you shoot spores or LC into your sugar water you can find your hole easy by feeling for the bump on top of the lid caused by the sealant. You then cover the hole made in the tyvek with micropore tape (or any tape that sticks well, micropore does great for me). When your LC is done you can take off the ring and remove the tyvek and then put the ring back on. Do this in a glove box. Then, while holding glove covered, alcohol swabbed fingers over your air ports, you shake up the mycelium to distribute it throughout the liquid and then insert your needle into the self healing port to suck up your LC. No LC will be leaking out as you tilt the jar towards the needle because of the self healing port. Throw the tyvek back on when you're done. Also, using a double layer of micropore tape over the holes will work as well as tyvek.
- After storing LC in the fridge, I would take it out and leave it at room temp for 1-2 days before using it. This will get it growing again and make it less likely to become too shocked to grow after sucking it and dispensing it from syringes.
- Along with the 16 or 14g needles, get yourself some 60-140cc syringes that you can use to inoculate spawn bags or multiple jars. Look online for farm equipment suppliers. They'll have em. Use 30-300cc's per spawn bag. Try the Poo with Extras Tek .
- If you can find a good 1/2 gallon or 1 gallon glass jug, use it! Nothing like plentiful LC. You will absolutely need a powerful Magnetic stirrer if using a batch this size though. You might have to compromise on the lid design on one of these. I've used a 1/2 gal jug with a small mouth and just put tyvek over the mouth and kept it in place with zip ties and rubber bands (no lid). Then I would pour the solution into one of my quart jars with an injection port when it was time to suck into syringes.
- Let me know if anything I've said is unclear or anything is missing or needs further elaboration. I want this to be easy to understand.
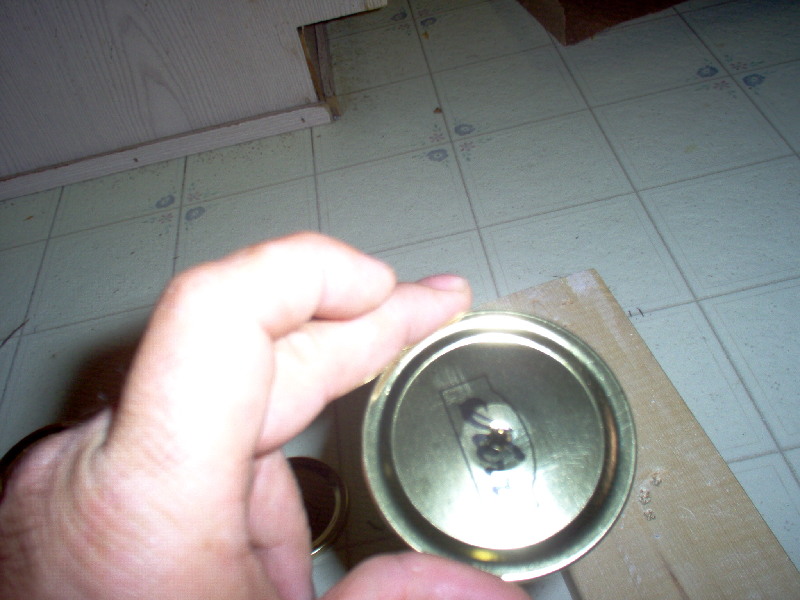
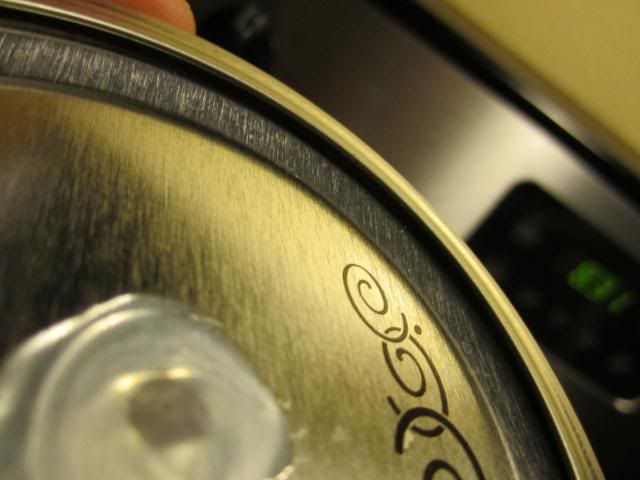
Cybers Self Healing Injection point lids
These are lids with self healing injection points. I use them for liquid culture jars.
I like to make liquid cultures firstand use them to inoculate my
substrate. I have tried lots of methodsand this is what I have settled
on. You will need
12 CanningJar Lids
1 small philips head screw driver
1 hammer
1block of wood
1 tube of RTV silicone gasket maker (Autopartsstore)
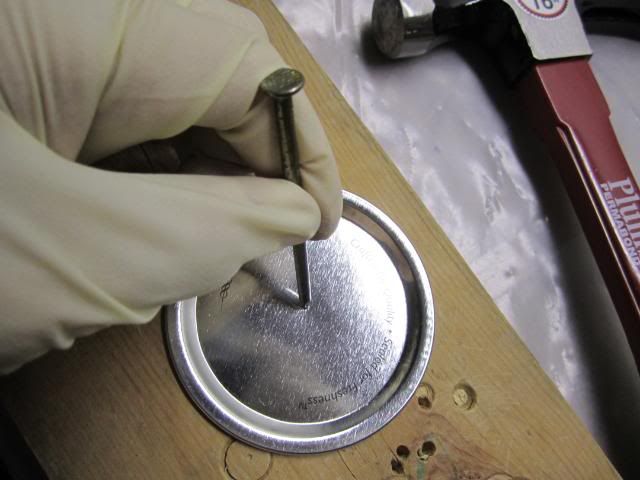
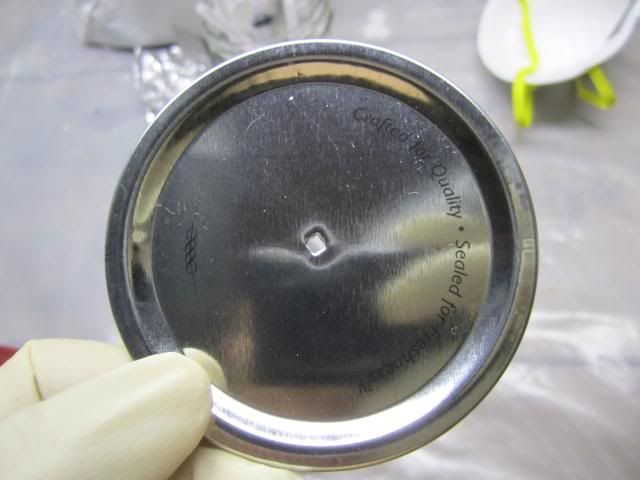
Lay one of the lids on the block of wood.

Put the screwdriver on in the center of the lid andhammer it through the lid


Now you should have a hole through the lid

Now take the tube of RTV Silicone

and Fill the hole in the middle of the lid. You want to haveit spread around the hole as well.

and do the bottom of the lid.

You need to make sure it is spread out a little. This addsstrength to it when the jar is under pressure. When you pressure cookthe liquid culture to sterilize it, the contents heat up. as theycool the jar will seal and there will be a vacuum on the jar. If youdo not spread the RTV Silicone out it will just suck it through thehole.
You will need to do this to all 12 lids and let it setfor 24 hours so that the silicone can harden.
12 CanningJar Lids
1 small philips head screw driver
1 hammer
1block of wood
1 tube of RTV silicone gasket maker (Autopartsstore)
Lay one of the lids on the block of wood.

Put the screwdriver on in the center of the lid andhammer it through the lid


Now you should have a hole through the lid
Now take the tube of RTV Silicone

and Fill the hole in the middle of the lid. You want to haveit spread around the hole as well.

and do the bottom of the lid.

You need to make sure it is spread out a little. This addsstrength to it when the jar is under pressure. When you pressure cookthe liquid culture to sterilize it, the contents heat up. as theycool the jar will seal and there will be a vacuum on the jar. If youdo not spread the RTV Silicone out it will just suck it through thehole.
You will need to do this to all 12 lids and let it setfor 24 hours so that the silicone can harden.
Cybers Liquid Culture Tek
Making the Jars all the way through inoculation. A walk through pictorial tek
Liquid cultures are one of the best ways to start a grow. It only takes a
small amount of a spore syringe to get a good liquid culture and you
can shorten your grow time while extending the use of your spore
syringe. First you will need a few things
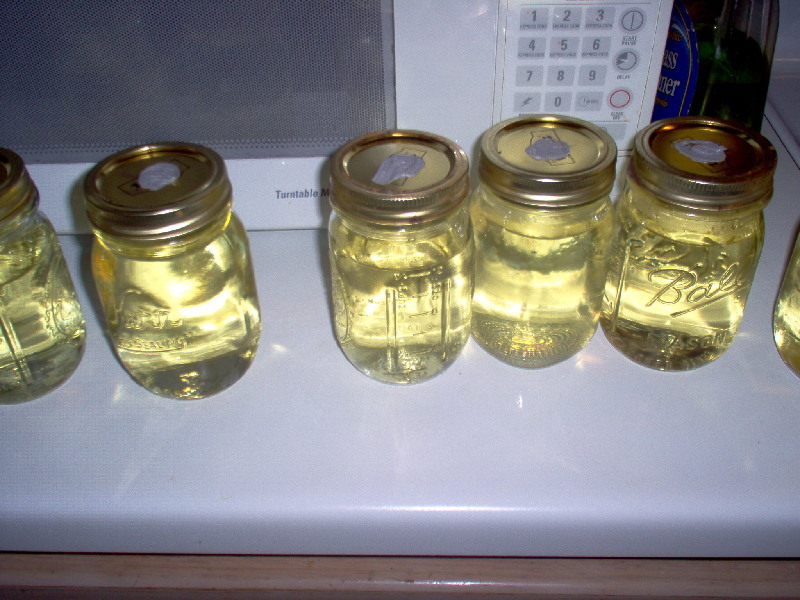
You will need 6 of the Cybers Self Healing Injection point lids , 6 Pint Jars, Light Corn Syrup, and a PC to make the LC Jars.
So, We start by getting out the Jars
We will fill each jar up to the point where it starts to curve in. Some jars are marked with a line as the fill point.

Once all the jars have water in them we add 2 teaspoons of light corn syrup to each jar. You can use Dextrose, Honey, or raw sugar. All are known to work but you will need to experiment to see how much of each works best for you.

Once you have the corn syrup in the jars you will put the self healing injection point lids on them.

And the rings. Note: The rings should be turned to the point here they are tight then loosened 1/4 turn. This lets the steam exit the jar when they are cooking and makes sure they do not explode.

Now, I take each jar and shake them to mix up the syrup and the water. You may note that I did not add anything to these jars like marbles, stir bars, or broken glass to brake up the mycilia. Many people do use things like this. At the time I did not. With the space at the top you can easily shake the jar hard enough to break up mycilia. I have recently gone over to using a magnetic stir bar and a magnetic stirrer.

Now, Load the jars into your pressure cooker and get it set up.

You will want to PC them for 15 min @ 15 PSI!
Once this is done you can unload and set them to the side to cool. Let them cool for 24 hours before using!

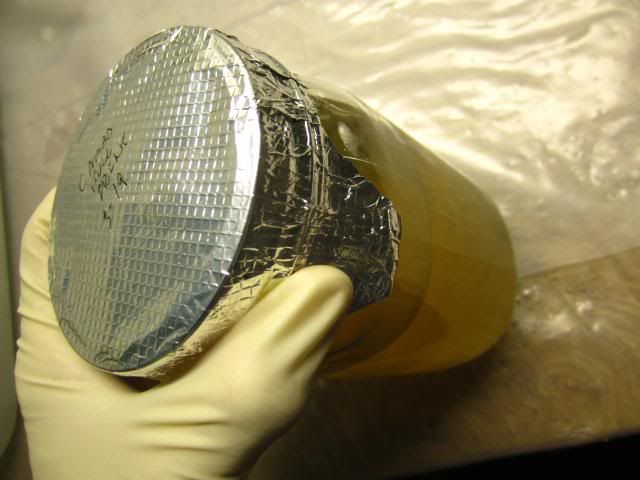
When I shot these picture I was not using aluminum foil on the jars. Now I cover the tops of the jars with tin foil before I PC them and keep the foil cover over them after words. The reason is it give me an easier surface to write on and it appears to have cut down some of the contamination.
Once your liquid cultures are cooled you will want to load them and everything you are going to need into your glove box or your flow hood.

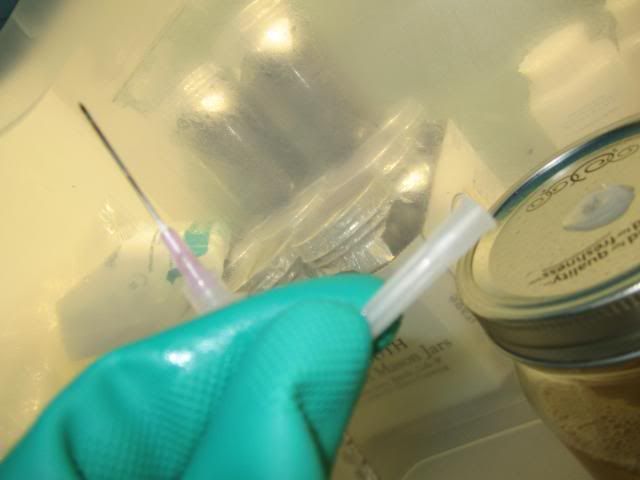
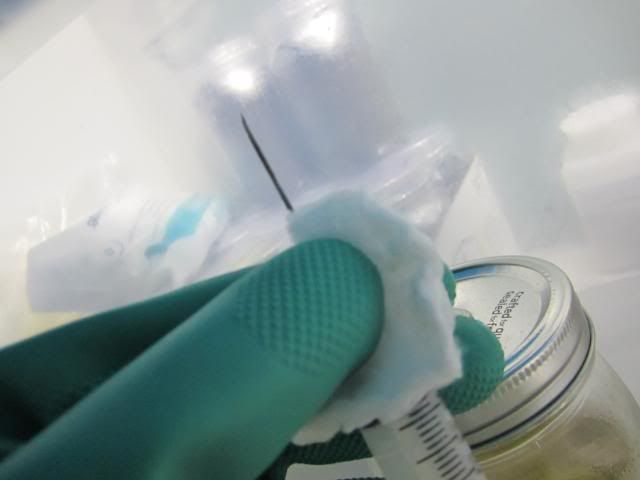
We will need to let air into the jars because they will have sealed. To do this in a controled manner I take an old syringe and pull the plunger out of it. I then take two cotton balls and fluff them up / pull them apart a little and push them into the body of the syringe.

This will be the inlet valve used to let air into your LC and bring the jar to room pressure. Here is how it works.
You first spray alcohol into the syringe soaking the cotton balls, then Sterilize the needle. when I was using the glove box I would use a lighter to flame the needle in the syringe.

You then alcohol the top of the jar where the injection point is and push the needle into the jar

You will want to give it a moment to allow the air into the jar and the jar to return to room pressure. If you dont, when you go to inject it the pressure difference will such the contents of your spore syringe into the jar.

I do each of the jars this way then take a cotton ball of alcohol and wipe the tops down again. After flaming the Spore syringe needle I inject 1cc of solution into the jar.

I then put my jars into the incubator to sit tell ready. All you really need is a place that is dark and between 70f and 80f

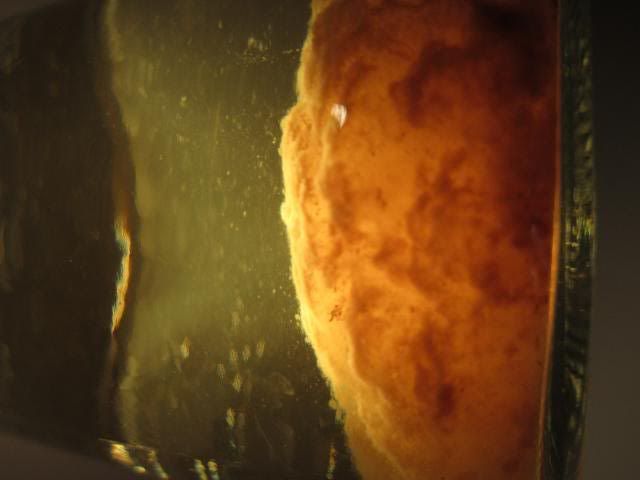
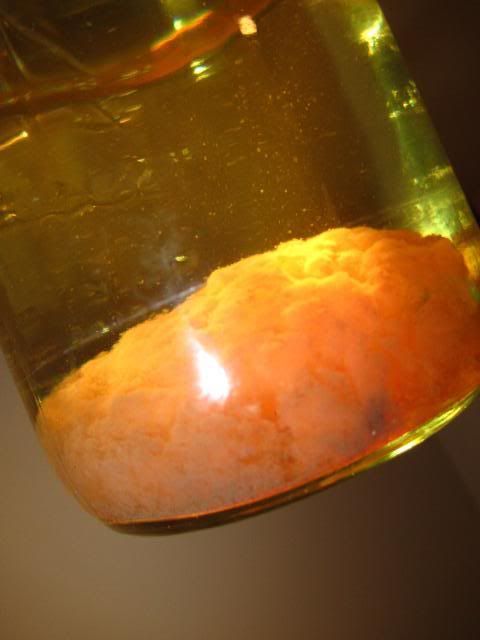
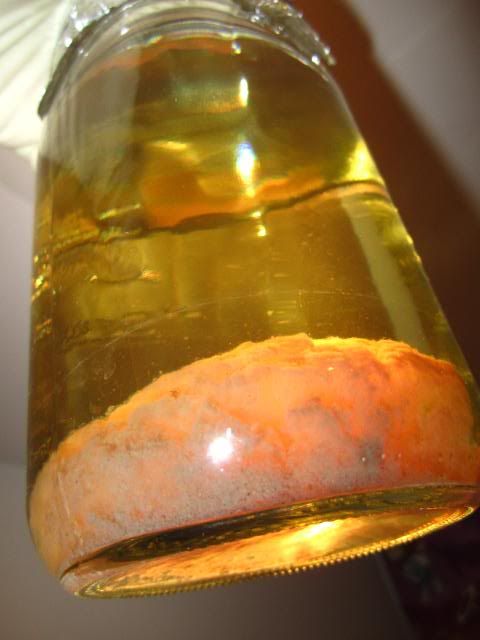
After 7 to 10 days you would have a jar that contains fluffy white stuff floating in the Liquid

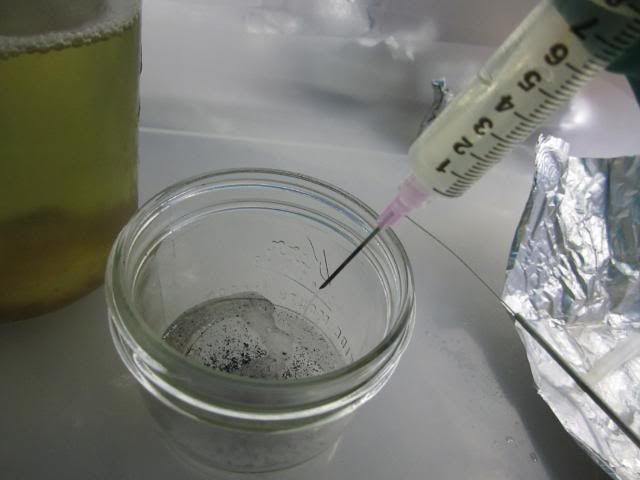
This is the mycilia and once shaken it is ready to go. Just stick a clean steril syringe into the self healing port and suck up 10cc's of the liquid.
Before I do anything bulk with an LC I first test it to make sure there is no contamination hiding it!!!
To do that you simply follow the PF tek to make up a BRF Jar, Inject it and wait a few days. You'll know if there is contamination!!!
Otherwise it will look like this in about 7 days after being inoculated with LC

You will need 6 of the Cybers Self Healing Injection point lids , 6 Pint Jars, Light Corn Syrup, and a PC to make the LC Jars.
So, We start by getting out the Jars

We will fill each jar up to the point where it starts to curve in. Some jars are marked with a line as the fill point.

Once all the jars have water in them we add 2 teaspoons of light corn syrup to each jar. You can use Dextrose, Honey, or raw sugar. All are known to work but you will need to experiment to see how much of each works best for you.

Once you have the corn syrup in the jars you will put the self healing injection point lids on them.

And the rings. Note: The rings should be turned to the point here they are tight then loosened 1/4 turn. This lets the steam exit the jar when they are cooking and makes sure they do not explode.

Now, I take each jar and shake them to mix up the syrup and the water. You may note that I did not add anything to these jars like marbles, stir bars, or broken glass to brake up the mycilia. Many people do use things like this. At the time I did not. With the space at the top you can easily shake the jar hard enough to break up mycilia. I have recently gone over to using a magnetic stir bar and a magnetic stirrer.

Now, Load the jars into your pressure cooker and get it set up.

You will want to PC them for 15 min @ 15 PSI!
Once this is done you can unload and set them to the side to cool. Let them cool for 24 hours before using!
When I shot these picture I was not using aluminum foil on the jars. Now I cover the tops of the jars with tin foil before I PC them and keep the foil cover over them after words. The reason is it give me an easier surface to write on and it appears to have cut down some of the contamination.
Once your liquid cultures are cooled you will want to load them and everything you are going to need into your glove box or your flow hood.

We will need to let air into the jars because they will have sealed. To do this in a controled manner I take an old syringe and pull the plunger out of it. I then take two cotton balls and fluff them up / pull them apart a little and push them into the body of the syringe.

This will be the inlet valve used to let air into your LC and bring the jar to room pressure. Here is how it works.
You first spray alcohol into the syringe soaking the cotton balls, then Sterilize the needle. when I was using the glove box I would use a lighter to flame the needle in the syringe.

You then alcohol the top of the jar where the injection point is and push the needle into the jar

You will want to give it a moment to allow the air into the jar and the jar to return to room pressure. If you dont, when you go to inject it the pressure difference will such the contents of your spore syringe into the jar.

I do each of the jars this way then take a cotton ball of alcohol and wipe the tops down again. After flaming the Spore syringe needle I inject 1cc of solution into the jar.

I then put my jars into the incubator to sit tell ready. All you really need is a place that is dark and between 70f and 80f

After 7 to 10 days you would have a jar that contains fluffy white stuff floating in the Liquid

This is the mycilia and once shaken it is ready to go. Just stick a clean steril syringe into the self healing port and suck up 10cc's of the liquid.
Before I do anything bulk with an LC I first test it to make sure there is no contamination hiding it!!!
To do that you simply follow the PF tek to make up a BRF Jar, Inject it and wait a few days. You'll know if there is contamination!!!
Otherwise it will look like this in about 7 days after being inoculated with LC


www.shroomery.org
 How to make a frickin liquid culture
http://www.shroomtal...l=&fromsearch=1 Ps. Cyanescen grow log for contest
http://www.shroomtal...showtopic=40816 "Preparing Grains" Squid's way.
http://www.shroomtal...showtopic=36329 Squidheads Agar tek (live tissue cloning)
http://www.shroomtal...showtopic=40270 MYA recipe
http://www.shroomtal...showtopic=38583 Outdoor bed
http://www.shroomtal...showtopic=38167 Indoor Tek
http://www.shroomtal...8&view=&hl=wave Cool finds
http://www.shroomtal...showtopic=41983 Cloning cactus


Liquid culture is a fluid containing water and essential nutrients to
ensure mycelium growth (mostly consists of malt extract or honey).
Spores are injected into the liquid. There they germinate and within a
couple of days you’ll have a liquid culture full of mycelium.
This liquid culture is then used to inoculate new substrates. Using liquid cultures, the substrate is colonized much faster compared to spores.
I read Otto’s method and decided to make my own liquid culture so I could teach you how to do it as well. Quick side note: this method of developing mycelium should work with every mushroom species.
 Step 1:
take the lids of your jars and puncture a hole in the middle with a
hammer and a nail. Smoothen the edge a little so you don’t cut yourself.
Step 1:
take the lids of your jars and puncture a hole in the middle with a
hammer and a nail. Smoothen the edge a little so you don’t cut yourself.
Clean the jars thoroughly, as well as the lids. Take some water and honey and proceed to step 2.

Step 2: Put the jars in a cooking pot along with the lids. Add some water and bring to a boil for about 30 minutes. This sterilizes the jars to avoid contaminations of bacteria and molds later on. Use a lid on your cooking pot to capture the steam.
After the 30 minutes are up, don’t do anything. First read step 3.

Step 3: Using the tong, take out the jars and place them on a clean working area whilst still hot. The water should still be hot or even boiling. Now pour about 250ml of the boiled water in the jars. Use a clean measuring cup if necessary.
Now add a tablespoon of honey to the sterilized water. Put the lids on the jars and go on to step 4.
Side note: the picture images a teaspoon, not a tablespoon.

Step 4: Cover the jars with tin foil. Make sure the tin foil is on there snugly, since this prevents water from entering the jar during sterilization in step 5.

Step 5: We’re going to repeat step 2. Place the jars in the pot and boil the water for 30 minutes, as pictures above. Use a lid on your cooking pot to capture the steam. Take the jars out after the 30 minute boil and leave them to cool over night.
WARNING : leave the tin foil ON the jars to cool. This prevents airborne contaminants to enter your jars.

Step 6: After the jars have cooled down over night, gently take away the tin foil. Using your ethanol and a tissue, thoroughly clean the lid of the jar. You’re now ready for inoculation.
To inoculate, you need a spore print, a live culture or a spore syringe.
A spore syringe/live culture: Rub your scalpel or knife using the ethanol. Gently rub about a knife tip worth of spores (you really don’t need much) off of the print. Unscrew the lid and insert the spores into the jar in one smooth motion. Make sure you close the lid as fast as possible. The same goes for live cultures. Cut out a piece of culture from a petri dish or cardboard and place it in the jar.
A spore syringe: Heat the needle of your syringe until it’s red hot. Wipe it down using ethanol and insert the needle in the hole in the jar lid in one smooth motion. Inject 1cc of spore solution. Eject your syringe.
Step 7: Cover the hole in the jar lid with micropore tape to keep out contaminants. Store somewhere for about one week at room temperature. Make sure you agitate the liquid every day by shaking it. You will start to see mycelium. Keep shaking it daily. This will prevent the mycelium to clump together. But be careful not to wet the micropore. Wet micropore is a open invention for contaminants.
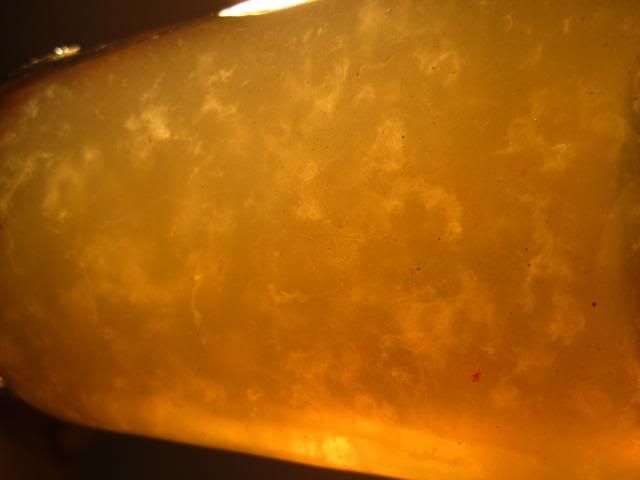
 All
the little spots you see in the image above are clumps of mycelium.
Suck these up using a sterile syringe for future use. You can keep these
syringes for a couple of months in the fridge.
All
the little spots you see in the image above are clumps of mycelium.
Suck these up using a sterile syringe for future use. You can keep these
syringes for a couple of months in the fridge.

Things u need
-Jars w/lids pints or quarts (if u use 1/2 pints use 1 teaspoon, pints use 1 tablespoon, quarts use 3 tablespoons)
-Pure all natural honey (grocery store)
-PC
-IPA/cotton swabs
-Clear RTV Silicone Adhesive Sealant. (auto parts shops should have em)
-Nail and hammer + a wooden block
-Aluminum foil squares
-Syringes (Spores101.com)
-GB
-Innoculation loop (or something sterile to scrape off spores from a spore print)
-Spore Print (Spores101.com)
-1 empty pint jar "sterilized"
The lid
-Punch a hole in the center of the lid and apply RTV
-To both sides! once applied allow 24hrs to completely dry !
-Im using 1 quart Kerr jars with 3 tablespoons of pure honey. (A bit much I know, but 1tablespoon works the same)
-After the honey has been added fill it up with HOT tap water to the Kerr sign on the glass. Place lid/ring tighten then SHAKE!
-Before u PC it twist the ring slightly off the lid so that u can feel the jiggle off the ring! This is IMPORTANT! Your jar will shatter if u do not twist it slightly off the lid!
-Notice how there's a gap beween the lid and the ring? I cant stress this enough folks u dont wanna tighten it at all, u want it loose with a jiggle to it.
-Cover with foil
-PC for 30mins at 15psi
-Once the PC cools off and the guage is at '0' psi take off PC lid and tighten LC lid "use caution its still hot be careful" by now it should have created a vacuum seal on its own and this is what it should look like.
-If u see floaters its fine. I think it gives the MYC something to latch itself onto u'll see in a bit. Let it cool off before we go onto the next step.
Inside the GB u will need
-Innoculation loop
-1 empty sterile pint jar
-Spore Print
-LC
-IPA filled cotton swab "on top of LC inside the GB"
1st u would want to disconnect the plunger from the syringe!
2nd wipe down LC lid with IPA cotton swab then remove syringe cap.
-Plunge needle into the LC releasing the vacuum seal.
-Now insert plunger back into the syringe and just leave it there.
3rd ready ur spore print over the sterile pint jar. "Does that print look familiar?"

-Scrap off as much as u can with ur innoculation loop.
4th fill that syringe with 10cc's of LC liquid.
-Expel into pint jar
-Repeat step 4 untill u'v got about 3-4 syringes worth about 30-40cc's.
-Remember to wipe lid and needle with IPA everytime it has come into contact with anything! "Before and after insertion."
5th step Suck back up all of the spores creating a "Spore Syringe"
-Plunge needle into the LC releasing the vacuum seal.
-Now insert plunger back into the syringe and just leave it there.
3rd ready ur spore print over the sterile pint jar. "Does that print look familiar?"
-Scrap off as much as u can with ur innoculation loop.
4th fill that syringe with 10cc's of LC liquid.
-Expel into pint jar
-Repeat step 4 untill u'v got about 3-4 syringes worth about 30-40cc's.
-Remember to wipe lid and needle with IPA everytime it has come into contact with anything! "Before and after insertion."
5th step Suck back up all of the spores creating a "Spore Syringe"
Edited by FLXNUTZ, 06 May 2010 - 05:34 AM.
By striving to do the impossible, man has always achieved what is
possible. Those who have cautiously done no more than they believed
possible have never taken a single step forward.
-Mikhail Bakunin-
-Mikhail Bakunin-
-Try to get all of the spore filled
liquid back into the LC! Once that's done, center the alcohol swab over
the LC injection port, give it a slight shake.
-Final step Leave the swab on top of the lid, cover the LC with foil, write down date and species.
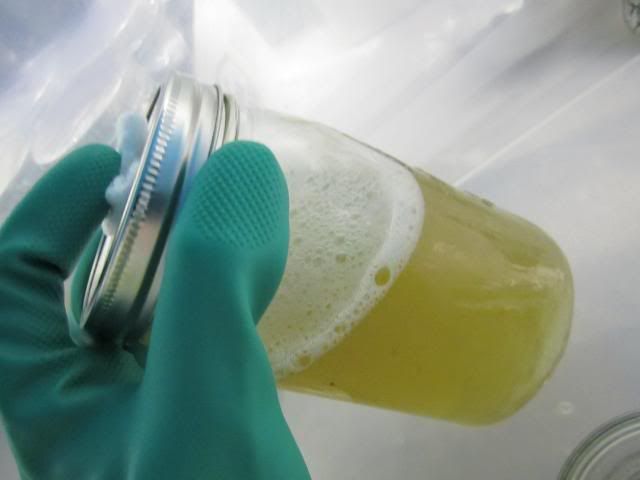
-Toss in the IC at 82'F for about 10days and this is what u should end up with...One massive blob of MYC
-And here's the shake before u knock up some jars with it.
Thats pretty much it...hope this helps some of u!
TIP: To get rid of the floaters and have clear LC, use HOT water, shake and dissolve the honey completely BEFORE u PC.
-Final step Leave the swab on top of the lid, cover the LC with foil, write down date and species.
-Toss in the IC at 82'F for about 10days and this is what u should end up with...One massive blob of MYC
-And here's the shake before u knock up some jars with it.
Thats pretty much it...hope this helps some of u!
TIP: To get rid of the floaters and have clear LC, use HOT water, shake and dissolve the honey completely BEFORE u PC.
Edited by FLXNUTZ, 02 October 2010 - 04:52 PM.
http://www.shroomtal...l=&fromsearch=1 Ps. Cyanescen grow log for contest
http://www.shroomtal...showtopic=40816 "Preparing Grains" Squid's way.
http://www.shroomtal...showtopic=36329 Squidheads Agar tek (live tissue cloning)
http://www.shroomtal...showtopic=40270 MYA recipe
http://www.shroomtal...showtopic=38583 Outdoor bed
http://www.shroomtal...showtopic=38167 Indoor Tek
http://www.shroomtal...8&view=&hl=wave Cool finds
http://www.shroomtal...showtopic=41983 Cloning cactus
Liquid culture
Normally spores are injected into a substrate. It takes time for the spores to germinate and to form mycelium. Mushroom growers find this a time consuming growing method. That’s why they created the liquid culture technique.
This liquid culture is then used to inoculate new substrates. Using liquid cultures, the substrate is colonized much faster compared to spores.
I read Otto’s method and decided to make my own liquid culture so I could teach you how to do it as well. Quick side note: this method of developing mycelium should work with every mushroom species.
Materials needed:
- 1 clean glass jar (about 250ml)
- Jar lids
- Hammer and a nail
- Tin foil
- Water
- Honey
- Table spoon
- Cooking pot
- A tong or any kind of large tweezer
- Micropore tape
- Ethanol (rubbing alcohol)
- Spore print/ spore syringe/ piece of mycelium from agar plates or cardboard
- Scalpel or sharp knife
Instructions:
 Step 1:
take the lids of your jars and puncture a hole in the middle with a
hammer and a nail. Smoothen the edge a little so you don’t cut yourself.
Step 1:
take the lids of your jars and puncture a hole in the middle with a
hammer and a nail. Smoothen the edge a little so you don’t cut yourself.Clean the jars thoroughly, as well as the lids. Take some water and honey and proceed to step 2.

Step 2: Put the jars in a cooking pot along with the lids. Add some water and bring to a boil for about 30 minutes. This sterilizes the jars to avoid contaminations of bacteria and molds later on. Use a lid on your cooking pot to capture the steam.
After the 30 minutes are up, don’t do anything. First read step 3.

Step 3: Using the tong, take out the jars and place them on a clean working area whilst still hot. The water should still be hot or even boiling. Now pour about 250ml of the boiled water in the jars. Use a clean measuring cup if necessary.
Now add a tablespoon of honey to the sterilized water. Put the lids on the jars and go on to step 4.
Side note: the picture images a teaspoon, not a tablespoon.

Step 4: Cover the jars with tin foil. Make sure the tin foil is on there snugly, since this prevents water from entering the jar during sterilization in step 5.

Step 5: We’re going to repeat step 2. Place the jars in the pot and boil the water for 30 minutes, as pictures above. Use a lid on your cooking pot to capture the steam. Take the jars out after the 30 minute boil and leave them to cool over night.
WARNING : leave the tin foil ON the jars to cool. This prevents airborne contaminants to enter your jars.

Step 6: After the jars have cooled down over night, gently take away the tin foil. Using your ethanol and a tissue, thoroughly clean the lid of the jar. You’re now ready for inoculation.
To inoculate, you need a spore print, a live culture or a spore syringe.
A spore syringe/live culture: Rub your scalpel or knife using the ethanol. Gently rub about a knife tip worth of spores (you really don’t need much) off of the print. Unscrew the lid and insert the spores into the jar in one smooth motion. Make sure you close the lid as fast as possible. The same goes for live cultures. Cut out a piece of culture from a petri dish or cardboard and place it in the jar.
A spore syringe: Heat the needle of your syringe until it’s red hot. Wipe it down using ethanol and insert the needle in the hole in the jar lid in one smooth motion. Inject 1cc of spore solution. Eject your syringe.
Step 7: Cover the hole in the jar lid with micropore tape to keep out contaminants. Store somewhere for about one week at room temperature. Make sure you agitate the liquid every day by shaking it. You will start to see mycelium. Keep shaking it daily. This will prevent the mycelium to clump together. But be careful not to wet the micropore. Wet micropore is a open invention for contaminants.
 All
the little spots you see in the image above are clumps of mycelium.
Suck these up using a sterile syringe for future use. You can keep these
syringes for a couple of months in the fridge.
All
the little spots you see in the image above are clumps of mycelium.
Suck these up using a sterile syringe for future use. You can keep these
syringes for a couple of months in the fridge.
Hiç yorum yok:
Yorum Gönder